Cell nuclei detection using StarDist#
In this notebook, we will use StarDist to detect cell nuclei in an image extracted from a public dataset of histopathology images.
StarDist is a deep-learning based Python library used for segmenting star-convex objects, such as cell nuclei, in 2D and 3D images. It is also available as plugins for ImageJ, Napari, and Qupath.
Setup#
Check that you have the stardist package installed (pip install stardist).
from stardist.models import StarDist2D
Show code cell output
2024-06-18 13:26:17.373574: I tensorflow/core/util/port.cc:113] oneDNN custom operations are on. You may see slightly different numerical results due to floating-point round-off errors from different computation orders. To turn them off, set the environment variable `TF_ENABLE_ONEDNN_OPTS=0`.
2024-06-18 13:26:17.375113: I external/local_tsl/tsl/cuda/cudart_stub.cc:32] Could not find cuda drivers on your machine, GPU will not be used.
2024-06-18 13:26:17.457778: I external/local_tsl/tsl/cuda/cudart_stub.cc:32] Could not find cuda drivers on your machine, GPU will not be used.
2024-06-18 13:26:17.856623: I tensorflow/core/platform/cpu_feature_guard.cc:210] This TensorFlow binary is optimized to use available CPU instructions in performance-critical operations.
To enable the following instructions: AVX2 AVX_VNNI FMA, in other operations, rebuild TensorFlow with the appropriate compiler flags.
2024-06-18 13:26:18.624155: W tensorflow/compiler/tf2tensorrt/utils/py_utils.cc:38] TF-TRT Warning: Could not find TensorRT
Download and read the image#
The image we’ll use in this tutorial is available for download on Zenodo (deepslide.png). This image is part of the DeepSlides public dataset.
In the cell below, we download this image from Zenodo and read it into a Numpy array.
from shared_data import DATASET  # This dataset has a reference to the image on Zenodo.
from skimage.io import imread

image_file = DATASET.fetch("deepslide.png")

image = imread(image_file)

print(f'Loaded image in an array of shape: {image.shape} and data type {image.dtype}')
print(f'Intensity range: [{image.min()} - {image.max()}]')
Loaded image in an array of shape: (513, 513, 3) and data type uint8
Intensity range: [3 - 245]
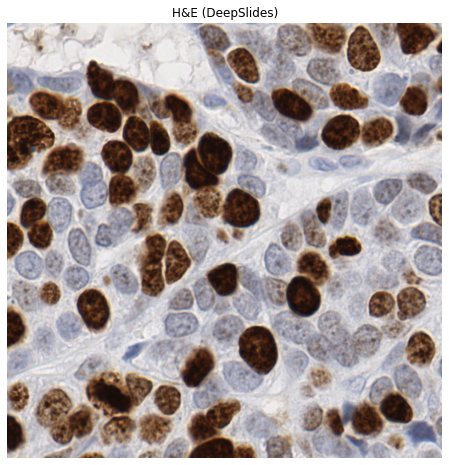
Visualize the image using matplotlib#
Let’s have a quick look at our example image.
import matplotlib.pyplot as plt

fig_mpl, ax = plt.subplots(figsize=(8, 8))
ax.imshow(image, cmap='gray')
plt.title("H&E (DeepSlides)")
plt.axis('off')  # Hide axes ticks
plt.show()
Normalize the image intensity#
Let’s rescale our image to the range 0-1. By doing so, it is also converted to an array of data type float.
from skimage.exposure import rescale_intensity

image_normed = rescale_intensity(image, out_range=(0, 1))

print(f'Intensity range: [{image_normed.min()} - {image_normed.max()}]')
print(f'Array type: {image_normed.dtype}')
Intensity range: [0.0 - 1.0]
Array type: float64
Initialize a pre-trained StarDist model#
The StarDist developers provide a few pre-trained models that may already be applied to suitable images.
Here, we will use the Versatile (H&E nuclei) model that was trained on images from the MoNuSeg 2018 training data and the TNBC dataset from Naylor et al. (2018).
model = StarDist2D.from_pretrained("2D_versatile_he")

model
Found model '2D_versatile_he' for 'StarDist2D'.
Loading network weights from 'weights_best.h5'.
Loading thresholds from 'thresholds.json'.
Using default values: prob_thresh=0.692478, nms_thresh=0.3.
2024-06-18 13:26:21.383039: I external/local_xla/xla/stream_executor/cuda/cuda_executor.cc:998] successful NUMA node read from SysFS had negative value (-1), but there must be at least one NUMA node, so returning NUMA node zero. See more at https://github.com/torvalds/linux/blob/v6.0/Documentation/ABI/testing/sysfs-bus-pci#L344-L355
2024-06-18 13:26:21.383481: W tensorflow/core/common_runtime/gpu/gpu_device.cc:2251] Cannot dlopen some GPU libraries. Please make sure the missing libraries mentioned above are installed properly if you would like to use GPU. Follow the guide at https://www.tensorflow.org/install/gpu for how to download and setup the required libraries for your platform.
Skipping registering GPU devices...
StarDist2D(2D_versatile_he): YXC → YXC
├─ Directory: None
└─ Config2D(n_dim=2, axes='YXC', n_channel_in=3, n_channel_out=33, train_checkpoint='weights_best.h5', train_checkpoint_last='weights_last.h5', train_checkpoint_epoch='weights_now.h5', n_rays=32, grid=(2, 2), backbone='unet', n_classes=None, unet_n_depth=3, unet_kernel_size=[3, 3], unet_n_filter_base=32, unet_n_conv_per_depth=2, unet_pool=[2, 2], unet_activation='relu', unet_last_activation='relu', unet_batch_norm=False, unet_dropout=0.0, unet_prefix='', net_conv_after_unet=128, net_input_shape=[None, None, 3], net_mask_shape=[None, None, 1], train_shape_completion=False, train_completion_crop=32, train_patch_size=[512, 512], train_background_reg=0.0001, train_foreground_only=0.9, train_sample_cache=True, train_dist_loss='mae', train_loss_weights=[1, 0.1], train_class_weights=(1, 1), train_epochs=200, train_steps_per_epoch=200, train_learning_rate=0.0003, train_batch_size=8, train_n_val_patches=3, train_tensorboard=True, train_reduce_lr={'factor': 0.5, 'patience': 50, 'min_delta': 0}, use_gpu=False)
Run the model#
We use the predict_instances method of the model to generate a segmenation mask (labels) and a representation of the cell nuclei as polygons (polys).
labels, polys = model.predict_instances(
    image_normed,  # The image must be normalized
    axes="YXC",
    prob_thresh=0.5,  # Detection probability threshold
    nms_thresh=0.1,  # Remove detections overlapping by more than this threshold
    scale=1,  # Higher values are suitable for lower resolution data
    return_labels=True,
)

# We also get detection probabilities
probabilities = list(polys["prob"])

n_detections = len(probabilities)

print(f'{n_detections} cells detected.')
119 cells detected.
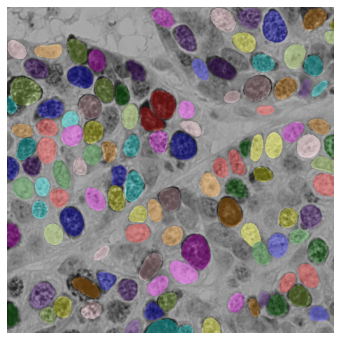
Visualize the segmentation using label2rgb#
The label2rgb function from Scikit-image assigns a random color to each object in a labeled segmentation mask. This is useful for visualization!
from skimage.color import label2rgb

fig, ax = plt.subplots(figsize=(12, 6))
rgb_composite = label2rgb(labels, image=image, bg_label=0)
ax.imshow(rgb_composite)
plt.axis('off')
plt.show()
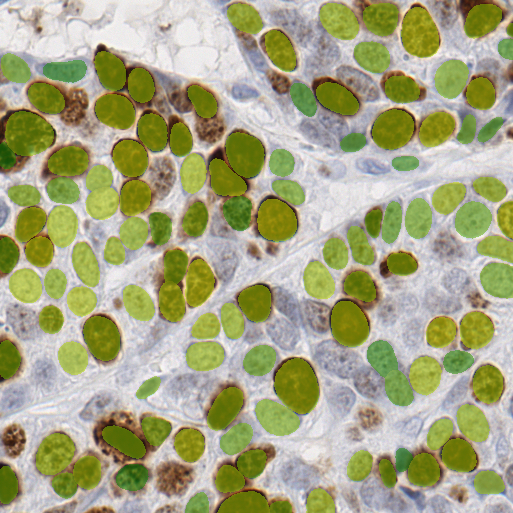
Visualize the segmentation using Pillow#
In the cell below, we use the Pillow library to overlay a segmentation mask on top of the image. The shade of green represents the detection probability.
from PIL import Image, ImageOps
import numpy as np

probabilities.insert(0, 0)

parametric_image = np.take(probabilities, labels)

image_ = Image.fromarray(image).convert("RGBA")

mask = Image.fromarray((labels == 0).astype('uint8')).convert("L")

alpha_mask = mask.point(lambda p: 128 if p == 0 else 0)

colorized_mask = ImageOps.colorize(
    Image.fromarray((parametric_image * 255).astype(np.uint8)).convert("L"),
    black="green",
    white="yellow",
    blackpoint=128,
    whitepoint=255,
).convert("RGBA")

colorized_mask.putalpha(alpha_mask)

composite_image = Image.alpha_composite(image_, colorized_mask)
Conclusion#
In this notebook, we have used StarDist to segment cell nuclei in an image from the DeepSlides dataset.